How to revise using flash cards

By Matt Burdett, 22 February 2020

This article is about how to use flashcards to help you revise for Geography exams.

Everyone uses flash cards. And there’s some great apps for your phone that you can use too.

So why don’t you remember anything?

Well, maybe you need to tweak the way you’re using them. Here’s my eight tips for making the most of flashcards!

  1. Make it flash. Flash doesn’t mean looking good; it means looking quick. If you’ve got more than a sentence to read, your flashcard is too long. Dump it.
  2. Make them for facts. Capital city of Brazil? Brasilia. See? It’s quick. Why is the capital city of Brasilia? Well, that’s a much more difficult – and lengthy – question, and shouldn’t be on a flashcard.
  3. If you get the card correct, put it in a pile to do again in a few days time. Get it wrong? Put it in a pile to do again later today or tomorrow.
  4. Use your flashcards often. Even if you know them.
  5. Shuffle them. If your cards always come in the same order, you’re going to learn the order, not the idea.
  6. Don’t have too many. Everyone’s different, but I can’t use more than 20 before it becomes a bit pointless.
  7. Colour code them according to the subject.
  8. Spend a maximum of a few minutes on flashcards. Little and often is better than a half hour flashcard session.

Got any more ideas for flashcards? Add a comment below!

How to revise using funnel notes

By Matt Burdett, 22 February 2020

This article is about how to use funnel notes to help you revise for Geography exams.

Funnel notes are a great way to ensure you have covered the information several times, and end up with a really good understanding of everything from the big to the small. There are five steps:

  1. Write down everything – literally everything – in full. It doesn’t matter if you use sentences, paragraphs, bullet points or diagrams, so long as you have everything on the page. Just make sure you aren’t copying the textbook. Use as many sources as you can in the time available.
  2. Look at the amount of space you’ve used for your notes. Take one sheet of paper, and from memory (that’s important!) write it all out again, but limiting yourself to the information that can fit on one page.
  3. Look at your work. Think carefully: what’s the most important thing? Then, take a post-it, or a flashcard, and write down the most important information. Again, do it from memory!
  4. You’ve now got the most important information on a single flashcard or post-it. Great! That’s the key thing you need to know. But of course, you want more detail for the exam. So now, take the same size paper you had in Step 2, and write as much as you can remember. When you’ve done, compare it to your original Step 2 notes and add anything you missed.
  5. So, now do Step 1 again, this time from memory. And then compare it to the original Step 1 you did using the books. Add in what’s missing.

INLINE_DRAWING: InlineDrawing

Awesome work! Think about it: you’ve now written:

  • the most important thing five times
  • the second most important stuff four times, and
  • the least important stuff twice.

This is going to help the important things stick in your head, and that’s what revision is all about.

How to organise revision notes

By Matt Burdett, 21 February 2020

This article is about how to organise your revision notes for Geography.

The main thing about revision, is that you need to do it again. That’s literally the root of the word – to REvise, meaning to do again.

Most students end up with pages and pages of notes. And that’s great, because it means you’ve been creating the content.

But most students forget to think about how they will REvise the notes they’ve made. Here’s my top tips on making your notes more effective:

  1. Make a contents list. If you’re writing on a laptop, you can do this easily by using the ‘text styles’ function. But it’s better to do it by hand. Try to organise your contents page along the same lines as your syllabus. It will help you spot anything that’s missing, and you can go back easily to REfind what you’ve done.
  2. Add page numbers. Sounds simple, but it’s really powerful. It means you can quickly find the things you want to revise. It also helps you to keep your notes tidy. And tidy notes lead to a tidy mind.
  3. Use heading effectively. If you’re using a layered heading system, such as red for the title, blue for the main header, green for the sub-header, this can help you structure your notes and see where you are on the page. Even better, you can then use only the subheadings of a specific colour to REcreate your notes later.
  4. Use loose-leaf folders, not notebooks. You can easily add in some extra revision notes if you want to, such as a mind-map that you’ve created from memory, and you can see your progress by keeping each of the pieces of REvision you do.
  5. Use the Cornell method to make your notes. Leave a margin down the side of the page, and a big space at the bottom. Make your notes in the top right section, then a day later summarise your ideas in the margin. A week later, summarise your ideas in the bottom section. It’s even better if you can do this from memory.

Should I type my revision notes?

By Matt Burdett, 21 February 2020

This article is about using handwritten notes to study Geography.

Should I type my revision notes? The answer is: no.

Well, actually it depends. If you are going to type your final assessment (such as a piece of internal assessment or coursework, or an essay that you will hand in to your teacher) then yes, typed notes might be helpful.

But if your notes will end up on a handwritten answer in an exam, then you should dispense with the laptop or tablet as soon as possible.

There are lots of benefits of handwritten notes. (The benefits of typed notes are later on the page – but spoiler alert, they still aren’t beneficial for revision purposes.)

The benefits of handwritten revision notes

Some of these benefits are relatively simple and quite obvious:

  • You practice writing by hand, which means you are likely to be more legible in the exam
  • Your hands will become more used to the act of writing – literally, your muscles will become stronger so you can write for longer
  • You can experiment with different styles of handwriting, finding the one that is quickest for you
  • You can read back to check that the way you form your letters is clear, and change anything that’s not good – such as ‘v’ appearing like an ‘r’ in some styles of handwriting
  • You practice staying on the lines (which is increasingly important as most exams are scanned and then marked on a computer screen)

However, the main benefits of handwriting your revision notes are in your brain, and that’s what we’ll focus on here.

Using your brain’s capacity to the maximum

If you have to look at your fingers while you type, even once a line, you’re not a touch typist. Touch typing happens when your typing is automatic, and you’re not even aware of what your fingers are doing. Every bit of your brain’s processing power is being used to understand and learn the content. If you can’t touch type, you’re wasting your brain’s processing power. That’s because you are having to work out where the letters are. But with handwriting, your brain switches to automatic mode: it learned how to form the letters when you started writing, so your attention is better focused on your work.

Haptic feedback

You know this term from your mobile phone settings. Haptic feedback is that little buzz you get when you type a letter on your mobile phone. It’s a total waste of battery. But you might not be aware of the real meaning of haptic feedback, which comes from touching and feeling your pen and paper. Haptic feedback literally means the feeling you get from touching things.

When you type, you are always touching the same keys, regardless of what you’re writing about. The feeling, weight, temperature of the keys is always the same. So, your brain is building a memory while relying only on the visual stimulus of seeing the characters on the screen. You can italicise, underline, bold, highlight, add textboxes and so on, but it’s still only a visual stimulus.

But your brain remembers things better if you use multiple stimuli. If you handwrite your notes, you’re probably going to not only see the difference on the page; you’re going to feel it when you use different pens, or pick up a different notebook, or touch a post-it sticky note when you move it from the ‘to revise’ to the ‘understood’ section of your notes. You might even smell the difference when you get out your highlighter compared to when you use a biro.

The ‘toilet paper’ scroll effect

How often are you on Facebook or Instagram and find your thumb pushing the screen on, when you aren’t even really thinking about what you’re seeing?

It’s like a giant toilet roll. The screen keeps on coming, more and more and more. There’s no end in sight and it’s easy to lose things on the screen. What’s worse, the screen constantly changes – a title that was at the top is now at the bottom because you scrolled through the page.

If you handwrite your notes, that doesn’t happen. You always know how far through your revision notes you are, because you can see and feel the paper. Even better, the layout of pages doesn’t change, so when you try to recall that important fact, you can remember its location on the page.

Drawing diagrams can really help

Be honest: how much time have you wasted trying to draw a diagram on the computer, when you could have done it in a fifth of the time by hand?

Diagrams are a great way to revise because they involve transfer, i.e. you transfer the information from one type to another (usually text to diagram). If you’re working on paper, this can really speed up your revision.

Shut down the distraction

Laptops and devices are distracting. Notifications constantly pop up and take your attention away. And revision can be, well, boring. You’re far more likely to quickly check your messages using Whatsapp Web if you have the browser open right there in front of you.

If you’re handwriting your notes, you can leave your devices in another room until you’ve done with your session. Then you can open up your messages as a reward for the hard work you’ve done.

The benefits of typed notes

You were still hoping you can keep your laptop on, right?

Well – ok there are some benefits to using typed notes.

  • They can be quicker to organise and re-organise
  • Spell-check can quickly tell you if you are spelling the word wrong, and help you correct it
  • If you’re a fast typist, it can be a lot quicker to make your notes
  • You can instantly share notes with others, and receive their notes too!
  • You can collaborate on note-taking, so your friends can tell you if you’ve missed something
  • A lot of information (like this website) is already typed, so you can copy and paste materials for shrinking down

So, yes, typing can sometimes be better for some things. But why not type your notes only for the first week or two – just until you have the overall outline of notes – and then print them, and switch to paper?

Two conclusions

  1. You’ll never type faster than you can think. And revision is all about thinking.
  2. You can’t be accused of timewasting if other people can see that you have physical notes in front of you.

6-point plan to stress-free revision

By Matt Burdett, 21 February 2020

This article is about how to plan your revision for Geography.

We all need to revise for our exams, but how to start, keep going and finish in time is often a bit bewildering. Most of us try to make a revision schedule and put in each subject to a particular time or day, but what we actually do in that time period is quite vague. We also waste a lot of time doing things that seem like revision but actually aren’t. This 6-point revision plan will help you to avoid procrastination at the times that matter most.

So, here’s my 6 point revision plan to help you structure your revision.

  • Step 1: Make a revision plan (Week 1)
    • Work out how much time you’ve got left, and how you’ll use it
  • Step 2: Check the syllabus (Week 1)
    • Make sure you know the language of the syllabus – it’s what the examiner will be using too
  • Step 3: Collate resources (Weeks 1 and 2)
    • Get all your materials together so you’re not surprised later. This includes catching up sessions that you missed.
  • Step 4: Identify weak areas (Week 2)
    • Work out what you really need to prioritise, and make sure that is a focus of your day-to-day revision timetable.
  • Step 5: Make notes and other materials (Week 3 onwards)
    • Ensure you do more than read and highlight. Make notes, flashcards, mind maps. Answer the questions on each page from this website.
  • Step 6: Do past papers and mark them yourself (Week 3 onwards)
    • Try doing timed papers, then wait 24 hours and mark your own work before asking your teacher to check you understood what was required.

Step 1: Make a revision plan

This first step should only take you an hour or two.

Unless you have just a couple of days left, you should make a revision plan in the form of a timetable. Here’s a few tips on the timetable:

  • Do your timetable(s) on paper – at least the final bit where you fill in what you’ll do in each revision period. It will help to avoid distraction by feeling like you need to open your laptop all the time to check your plans.
  • Have two timetables. The first is a week-by-week timetable up to the date of the exam. The second is a day-to-day timetable.

The week-by-week timetable

Make a weekly timetable with the dates of the start of each week across the top, and spaces to write your subjects down the left. It might look something like this:

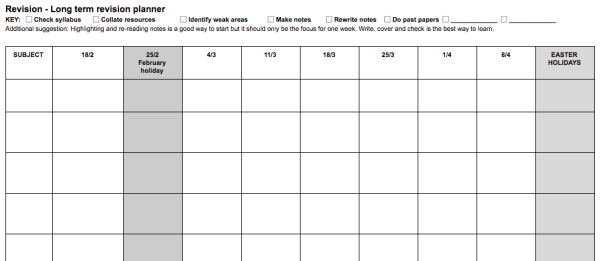
In the table, write down what you will do to revise each of those subjects (see Step 2 onwards, below). Ideally you’ll have a mix of activities each week across different subjects

The day-to-day timetable

At the start of each week, you’ll need to transfer your week-by-week plan into a plan for the week. It might look something like this:

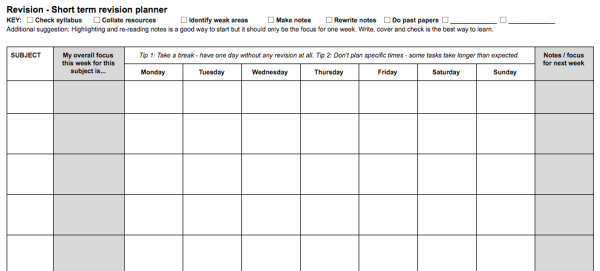
Some people find it helpful to split the day into specific times, like 9-940am. It’s a good idea to have a rough plan. But it can be stressful to limit yourself to an exact time. Some sessions might be easier than expected, while others might be harder – so allow a bit of flexibility in the length of the revision period.

Most importantly, don’t try to do every subject every day. Have at least one day off between revision sessions for each subject, as this can help your longer term memory recall. It will also stop you from overloading yourself with too much work.

Other top tips for your day-to-day plan:

  • Revision sessions should be a sensible concentration period, which is usually somewhere between 25 and 40 minutes
  • Aim for just two or three revision sessions per day while you still have a structured day such as school, college or lectures. Put one in the morning before the day starts if you have time, and the others when you get home.
  • If you are lucky enough to have study leave, you should have between 6 and 9 revision sessions per day
  • In this revision planner, you can be specific about the topic you’ll study (e.g. Paper 1, Urban Environments’) but you should also colour code your planning. On my example you can see some ideas of the kind of activities you should do.

Step 2: Check the syllabus

Step 2 will take you an hour or so for each subject you study.

The examiner will use the syllabus, and so should you. By knowing what’s on the syllabus, you can avoid wasting time revising non-exam stuff, and avoid accidentally missing a section of the course.

A good way to use the syllabus is traffic lighting. Highlight in green things you are comfortable with; yellow things you’re not sure about; and red things you haven’t got a clue about. Then, re-write the red and yellow points and add them into your revision timetable somewhere. It will help you to focus your time later on, and it ensures you are reading the syllabus carefully.

The main benefit of using the syllabus is to know the language of the exam board. For example, if the syllabus asks about sustainability, it might give some guidance on what type (economic? social? environmental?), so you know what you should focus your revision on.

Your textbooks are often written for a specific course, but their coverage is often uneven. There might be topics that are dealt with in a lot of detail but have never had a question in the exam. And there are often topics which textbooks don’t cover very well, especially if the syllabus has a new point that hasn’t been in the previous textbooks. Therefore, always use the syllabus, as well as a textbook if you have one.

Remember, your teacher might not always have taught the syllabus in the same order, so this step is a great opportunity to re-organise your ideas and make sure you understand the requirements.

Step 3: Collate resources

Step 3 might take just a few minutes if you’ve been well organised throughout your course, or it might take a whole week if you’re just getting yourself sorted. Either way, it’s really important so don’t miss this step.

To ‘collate’ means to gather together and organise. You need to make sure you have everything you need.

For many students, this is the point at which the panic sets in. It’s when you realise that you really didn’t pay attention at all in the summer term and now you have no idea where to get resources. But, don’t worry – you have plenty of time!

Collating your notes doesn’t mean reading them in detail. It means that you know where they are and they are ready to use. It’s really important to make sure that you have got materials on everything you plan to revise, even if you didn’t write them yourself. Otherwise you will waste time later trying to find them. It’s also good to go to your teacher well in advance and ask if they have materials on any missing points, rather than ask them at the last minute.

I recommend ensuring your resources are printed out at this stage. If you don’t have many notes and are going to use websites like this one to help you, then make sure you have a document with all the relevant links that you plan to use.

Step 4: Identify weak areas

This is where you really start to work, so this step might take anything from a week to a month.

Identifying your weak areas is hopefully something you’ve already done during Step 2: Check the syllabus. Now it’s time to work on them.

If you’ve followed the previous steps, you’ll have notes on everything (even if they’re from a third-party source like this website), and you’ll know what you need to learn. It’s time to put these topics into the day-to-day revision timetable and focus on them.

The chances are that your weak areas are also everyone else’s weak areas. In which case, this is a good time to get talking. Find out from friends if they have the same problem, and see if you can organise get-togethers where you learn from each other. You could also ask your teacher to run a revision session on these specific areas.

Step 5: Make notes and other materials

Hopefully you’re feeling quite confident about the course by now, so it’s time to get your head down. Ideally this step will take you two to three months, but you can do it in much less if you have run out of time.

We all know what revision looks like for most people: reading notes, highlighting, and trying to remember what was written.

None of that will work wonders for you. It’s a great start – but it won’t make a huge difference.

This is because reading and highlighting are passive revision strategies. You don’t actually do anything with the information – you just hope that it is going in.

To make your revision count, you need active revision strategies. These are things like:

  • Funnel notes
  • Flash cards (using questions, not just prompts)
  • Mind maps
  • Concept maps

There’s more detail about each of these elsewhere on this site. The thing that each of them has in common is that you have to do something with your notes. There’s a basic feature of all active revision strategies:

  1. Read
  2. Cover
  3. Write
  4. Check

It’s the ‘cover’ bit that’s really important: by not having the information there to see, you force your brain to strain!

Step 6: Do past papers and mark them yourself

Take an hour or two a week to do past papers.

Doing past papers is great. And your teacher will claim to be really happy when you bring them in for marking.

In truth, your teacher will loathe the fact that you have given them extra marking. And more importantly, it isn’t necessarily that great for you either. When you give the marking to someone else, you’re back to passive revision instead of active revision. The solution? Wait 24 hours, mark your own work, and then give the papers to your teacher for checking.

This means your teacher isn’t really marking your paper, they’re marking your marking, if that makes sense. You have done the hard work of both answering the question, and interpreting the mark scheme.

  • If your teacher agrees with your mark, it shows that you have understood the requirements of the examiner and where you are within those requirements. Great – revision is working!
  • If your teacher disagrees with your mark, it shows that you don’t truly understand what the examiner is looking for. This is where you go to your teacher and ask them to explain further. Great – revision is working!

Secret Step 7: Finishing your revision

There’s a secret final step to finishing your revision. It’s called ‘stop’.

You need to be aware of when you have done as much revision as you can, and when it’s worth stopping. A lot of students stress themselves out trying to cram the night before the exam. If you’ve got as far as reading this, you’ve probably started revision early. Last minute revision is unlikely to make a big difference. By all means go over your notes one last time, but try to finish your revision by looking at the huge amount of work you’ve done and tell yourself how prepared you are.

Finally – don’t burn your notes, or throw them away. Future students might be willing to pay you for them!